Ilmu yang sangat berguna

20 05 2009

Akhirnya setelah beberapa bulan ini fakum nulis blog, sekarang mencoba untuk semangat lagi menulis..:D .  Sebenarnya sih ada waktu untuk nulis tapi ngelawan rasa malas nya itu loh yang g tahan…hehehehe. Akhirnya hari ini lah yang sangat tepat untuk menulis kembali.

Kali ini saya ingin berbagi cerita mengenai sedikit pengalaman saya,   di kerjaan yang baru sekarang saya merasakan bener gimana rasanya semangat dalam bekerja karena kerjaan yang sekarang memang bener-bener sesuai dengan bidang yang saya minati sewaktu kuliah yakni IT Networking. Karena saya merasakan bener gimana bermanfaatnya ilmu yang saya dapatkan ketika saya masih kuliah dan sewaktu masih menjadi Asisten Laboratorium sistem & Jaringan komputer ketika bekerja di perusahaan ini. Selain itu di perusahaan sekarang juga banyak tersedia perangkat-perangkat jaringan yang bisa saya pakai buat percobaan, karena seperti yang kita tahu, untuk belajar jaringan memang lebih baik langsung ada perangkatnya untuk praktek karena kita bisa lebih cepat mengerti.

Dan alhamdulilah saya tidak terlalu susah untuk adaptasi mengenai kerjaan di perusahaan yang sekarang. Mudah-mudahan ilmu yang saya punya bisa bermanfaat buat perusahaan saya yang sekarang..amin..

Sebenarnya sudah banyak yang pingin saya tulis kembali, khususnya mengenai tutorial-tutorial mengenai percobaan-percobaan yang sudah saya lakukan beberapa bulan belakangan ini tentang networking dan server-server, tapi kok masih males ya.. 😀

Dan mudah-mudahan dengan tulisan ini saya bisa lebih semangat lagi untuk menulis..hehehe.


Blog ku menduduki posisi teratas di google

20 11 2008

Sebenarnya sih lagi iseng2 aja waktu di kantor sambil browsing2, eh punya pikiran untuk ngeliat posisi blog ku di google, eh ternyata muncul No.1. Wah pas ngeliatnya gmn gitu rasanya, seneng y pastinya, karena blog ku bisa menduduki nomor teratas…hore..hore..hore.. 🙂 Mudah2an aja bisa bertahan..hehehe..

Ini capture posisi blog ku di search google.

myblog3


Install dan kofigurasi Awstats

27 10 2008

Apa itu Awstats?

Awstats merupakan salah satu tools untuk menganalisa statistik log dari sistem anda yang dapat berupa web, ftp, mail, wap, proxy dan streaming server yang kemudian oleh awstat tersebut akan di olah dan hasilnya akan di tampilkan dalam format cgi, untuk penjelasan lebih lengkap silahkan kunjungi web resminya http://awstats.sourceforge.net/. Kali ini saya masih menggunakan Centos 5.2 untuk mencoba nya, jadi silahkan sesuaikan dengan distro anda.

Sebelum anda menginstall awstat di server anda, pastikan paket “perl” sudah terinstall di server anda, anda dapat menggunkan yum untuk menginstallnya.
[root@heri ~]# yum -y install perl

Tahap-tahap instalasi:

1. Download terlebih dahulu paket awstats:
[root@heri ~]# wget http://prdownloads.sourceforge.net/awstats/awstats-6.8.tar.gz

2. Ekstrak awstats ke direktori apache anda
[root@heri ~]# tar xzvf awstats-6.8.tar.gz -C /var/www/html

3. Pindah ke direktori apache anda.
[root@heri ~]# cd /var/www/html

4. Ubah nama direktori awstats-6.8 menjadi awstats
[root@heri html]# mv awstats-6.8 awstats

5. Pindah ke direktori tools di bawah direktori awstats.
[root@heri html]# cd awstats/tools/

6. Jalankan script perl di bawah ini untuk membuat file statistiknya.
[root@heri tools]# ./awstats_configure.pl
----- AWStats awstats_configure 1.0 (build 1.8) (c) Laurent Destailleur -----
This tool will help you to configure AWStats to analyze statistics for
one web server. You can try to use it to let it do all that is possible
in AWStats setup, however following the step by step manual setup
documentation (docs/index.html) is often a better idea. Above all if:
- You are not an administrator user,
- You want to analyze downloaded log files without web server,
- You want to analyze mail or ftp log files instead of web log files,
- You need to analyze load balanced servers log files,
- You want to 'understand' all possible ways to use AWStats...
Read the AWStats documentation (docs/index.html).
-----> Running OS detected: Linux, BSD or Unix
Warning: AWStats standard directory on Linux OS is '/usr/local/awstats'.
If you want to use standard directory, you should first move all content
of AWStats distribution from current directory:
/var/www/html/awstats
to standard directory:
/usr/local/awstats
And then, run configure.pl from this location.
Do you want to continue setup from this NON standard directory [yN] ? y
-----> Check for web server install
Enter full config file path of your Web server.
Example: /etc/httpd/httpd.conf
Example: /usr/local/apache2/conf/httpd.conf
Example: c:\Program files\apache group\apache\conf\httpd.conf
Config file path ('none' to skip web server setup):
> /etc/httpd/conf/httpd.conf
-----> Check and complete web server config file ‘/etc/httpd/conf/httpd.conf’
Add ‘Alias /awstatsclasses “/var/www/html/awstats/wwwroot/classes/”‘
Add ‘Alias /awstatscss “/var/www/html/awstats/wwwroot/css/”‘
Add ‘Alias /awstatsicons “/var/www/html/awstats/wwwroot/icon/”‘
Add ‘ScriptAlias /awstats/ “/var/www/html/awstats/wwwroot/cgi-bin/”‘
Add ‘’ directive
AWStats directives added to Apache config file.
-----> Update model config file ‘/var/www/html/awstats/wwwroot/cgi-bin/awstats.model.conf’
File awstats.model.conf updated.
—–> Need to create a new config file ?
Do you want me to build a new AWStats config/profile
file (required if first install) [y/N] ? y
-----> Define config file name to create
What is the name of your web site or profile analysis ?
Example: www.mysite.com
Example: demo
Your web site, virtual server or profile name:
> heri.com
-----> Define config file path
In which directory do you plan to store your config file(s) ?
Default: /etc/awstats
Directory path to store config file(s) (Enter for default):
> <== Silahkan tekan enter saja
-----> Create config file '/etc/awstats/awstats.heri.com.conf'
Config file /etc/awstats/awstats.heri.com.conf created.
-----> Restart Web server with ‘/sbin/service httpd restart’
Stopping httpd: [ OK ]
Starting httpd: [ OK ]
-----> Add update process inside a scheduler
Sorry, configure.pl does not support automatic add to cron yet.
You can do it manually by adding the following command to your cron:
/var/www/html/awstats/wwwroot/cgi-bin/awstats.pl -update -config=heri.com
Or if you have several config files and prefer having only one command:
/var/www/html/awstats/tools/awstats_updateall.pl now
Press ENTER to continue... <== Tekan enter
A SIMPLE config file has been created: /etc/awstats/awstats.heri.com.conf
You should have a look inside to check and change manually main parameters.
You can then manually update your statistics for 'heri.com' with command:
> perl awstats.pl -update -config=heri.com
You can also read your statistics for 'heri.com' with URL:
> http://localhost/awstats/awstats.pl?config=heri.com
Press ENTER to finish... <== Tekan enter untuk finish

5. Script awstats_configure.pl tadi secara otomatis akan menambahkan pada file konefigurasi httpd.conf
[root@heri tools]# vi /etc/httpd/conf/httpd.conf
[..]
#
# Directives to allow use of AWStats as a CGI
#
Alias /awstatsclasses "/var/www/html/awstats/wwwroot/classes/"
Alias /awstatscss "/var/www/html/awstats/wwwroot/css/"
Alias /awstatsicons "/var/www/html/awstats/wwwroot/icon/"
ScriptAlias /awstats/ "/var/www/html/awstats/wwwroot/cgi-bin/"
#
# This is to permit URL access to scripts/files in AWStats directory.
#
<Directory "/var/www/html/awstats/wwwroot">
Options None
AllowOverride None
Order allow,deny
Allow from all
</Directory>
[..]

6. Edit file awstats.heri.conf menjadi seperti dibawah ini.
LogFile="/var/log/httpd/mylog.log" menjadi LogFile="/var/log/httpd/access_log"
DirData="/var/lib/awstats" menjadi DirData="/var/www/html/awstats"
SiteDomain="heri.com" <== Pastikan juga terdapat ini.

7. Jalankan command dibawah ini untuk update database awstats.
[root@heri ~]# /var/www/html/awstats/wwwroot/cgi-bin/awstats.pl -config=heri.com -update
Create/Update database for config "/etc/awstats/awstats.heri.com.conf" by AWStats version 6.8 (build 1.910)
From data in log file "/var/log/httpd/access_log"...
Phase 1 : First bypass old records, searching new record...
Searching new records from beginning of log file...
Phase 2 : Now process new records (Flush history on disk after 20000 hosts)...
Jumped lines in file: 0
Parsed lines in file: 123
Found 0 dropped records,
Found 0 corrupted records,
Found 0 old records,
Found 123 new qualified records.

8. Kemudian buka browser anda dengan mengetikkan http://heri.com/awstats/awstats.pl?config=heri.com

9. Anda juga bisa mengupdate database awstats melalui browser, dengan syarat anda harus merubah command di bawah ini.
[root@heri ~]# vi /etc/awstats/awstats.184.conf
AllowToUpdateStatsFromBrowser=0 menjadi AllowToUpdateStatsFromBrowser=1

10. Serta jangan lupa juga merubah permision folder di bawah ini.
[root@heri ~]# chmod 777 -R /var/log/httpd/
[root@heri ~]# chmod 777 -R /var/www/html/awstats/

11. Sekarang buka kembali browser anda dan click tombol “Update Now”

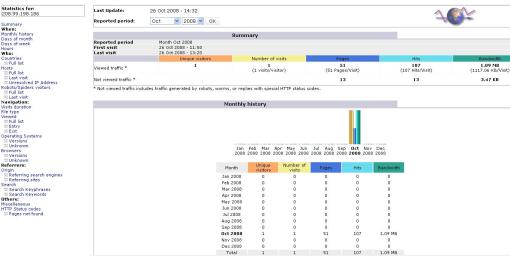
12. Maka secara otomatis database awstats akan terupdate, silahkan anda perhatikan pada gambar dibawah ini, silahkan amati jumlah HIT nya apakah ada perubahan atau tidak.

Sampai disini dulu ya, mau nerusin kerjaan lain nih… 🙂
Selamat mencoba, semoga bisa bermanfaat. 🙂


Instalasi dan konfigurasi Cacti di Centos 5.2

22 10 2008

Apa itu cacti?
Cacti adalah salah satu aplikasi open source yang menrupakan solusi  pembuatan grafik network yang lengkap yang didesign untuk memanfaatkan kemampuan fungsi RRDTool sebagai  peyimpanan data dan pembuatan grafik. Cacti menyediakan pengumpulan data yang cepat, pola grafik advanced, metoda perolehan multiple data, dan fitur pengelolaan user. Semuanya dikemas secara intuitif, sebuah interface yang mudah digunakan  mudah dipahami untuk local area network hingga network yang kompleks dengan ratusan device. Dengan menggunakan cacti kita dapat memonitor trafik yang mengalir pada sebuah server.

Paket-paket yang di butuhkan sebelum menginstal cacti:
1. php-snmp
2. rrdtool
3. net-snmp & net-snmp-utils
4. httpd
5. php
6. php-mysql
7. mysql
8. mysql-server

Install paket-paket pendukung:
[root@heri ~]# yum install httpd php mysql php-mysql mysql-server
[root@heri ~]# yum install php-snmp net-snmp net-snmp-utils rrdtool

Tahap-tahap instalasi CACTI:

1. Buat user untuk menjalankan database cacti
[root@heri ~]# groupadd cacti
[root@heri ~]# useradd -g cacti cactiuser
[root@heri ~]# passwd cactiuser
Changing password for user cactiuser.
New UNIX password: cactipassword
Retype new UNIX password: cactipassword
passwd: all authentication tokens updated successfully.

2. Download terlebih dahulu paket cacti nya:
[root@heri ~]# wget http://www.cacti.net/downloads/cacti-0.8.7b.tar.gz

3. Ekstrak hasil downloadan tersebut dan hasil ekstrakan letakkan di direktori apache anda.
[root@heri ~]# tar xzvf cacti-0.8.7b.tar.gz -C /var/www/html/

4. Pindah direktori ke direktori apache anda.
[root@heri ~]# cd /var/www/html/

5. Rubah nama forder cacti-0.8.7b menjadi cacti
[root@heri html]# mv cacti-0.8.7b cacti

6. Buat database untuk cacti dengan nama “cacti”.
[root@heri html]# mysqladmin -u root -p create cacti Baca entri selengkapnya »


Install Groundwork di Centos 5.2

22 10 2008

Apa itu groundwork?

Groundwork adalah salah satu aplikasi open source yang digunakan untuk monitoring server-server kita. Mungkin anda masih ingat dengan artikel saya sebelumnya mengenai instalasi nagios, nah kalau pada artikel sebelumnya untuk membuat monitoring server menggunakan nagios kita perlu menggunakan command-command, nah kalau pada groundwork untuk membuat monitoring server-server menggunakan nagios, kita dapat dengan mudah membuatnya melalui tampilan web(web based) sehingga tidak membutuhkan waktu yang lama ketika kita ingin menambahkan monitoring server kita. Baik kalau gitu kita mulai saja instalasinya..

Tahap-tahap instalasi:

INSTALL perl-DBI di komputer anda:
1. Buat terlebih dahulu direktori downloads untuk menyimpan hasil-hasil downloadan:
[root@heri ~]# mkdir /downloads

2. Pindah ke direktori download;
[root@heri downloads]# cd /downloads

3. Cek terlebih dahulu apakah sudah terinstall atau belum dengan:
[root@heri downloads]# rpm -qa | grep perl

4. Kalau belum ada download dulu:
[root@heri downloads]# ftp://archive.groundworkopensource.com/pub/pre-req-community-edition/perl-DBI-1.40-5.i386.rpm

5. Kemudian install:
[root@heri downloads]# rpm -ivh perl-DBI-1.40-5.i386.rpm

INSTALL Java JDK Update 6:

1. Download dulu paketnya:
[root@heri downloads]# ftp://archive.groundworkopensource.com/pub/pre-req-community-edition/jdk-1_5_0_06-linux-i586-rpm.bin.tar.gz

2. Kemudian ekstrak:
[root@heri downloads]# tar xvfz jdk-1_5_0_06-linux-i586-rpm.bin.tar.gz

3. Rubah permision nya:
[root@heri downloads]# chmod +x jdk-1_5_0_06-linux-i586-rpm.bin

4. Kemudian jalankan perintah ini:
[root@heri downloads]# ./jdk-1_5_0_06-linux-i586-rpm.bin

Nanti akan muncul persetujuan, jawab yes untuk melanjutkannya. Seluruh file instalasi java akan tersimpan di /usr/java

INSTALL Mysql community edition:

1. Download paket-paket di bawah ini terlebih dahulu:
[root@heri downloads]# wget http://dev.mysql.com/get/Downloads/MySQL-5.0/MySQL-server-community-5.0.67-0.rhel5.i386.rpm/from/http://mysql.easynet.be/
[root@heri downloads]# wget ftp://mirror.switch.ch/pool/1/mirror/mysql/Downloads/MySQL-5.0/MySQL-client-community-5.0.51a-0.rhel5.i386.rpm
[root@heri downloads]# wget http://dev.mysql.com/get/Downloads/MySQL-5.0/MySQL-shared-community-5.0.67-0.rhel5.i386.rpm/from/http://mysql.easynet.be/
[root@heri downloads]# wget http://dev.mysql.com/get/Downloads/MySQL-5.0/MySQL-devel-community-5.0.67-0.rhel5.i386.rpm/from/http://mysql.easynet.be/

2. Kemudian install semuanya:
[root@heri downloads]# rpm -ivh MySQL-* Baca entri selengkapnya »


How to install and Configure ProFTPd with integrate the MySQL

21 10 2008

What is ProFTPd ?

ProFTPd is a FTP daemon for unix and unix-like operating systems. With we using ProFTPd we can develop a FTP Server. And also ProFTPd easy to configuration.

System requirements
1. Apache
2. Mysql
3. PhpMyadmin

You can use yum to install these packages:

[root@heri ~] yum install mysql mysql-server phpMyAdmin httpd

Step by step instalation:

1. Install Proftpd-mysql with “YUM”.

[root@heri ~]# yum install proftpd-mysql

2. Use the following command to make sure instalation of ProFTPd.

[root@heri ~]# rpm -qa | grep proftpd
proftpd-mysql-1.3.1-1.el5.rf
proftpd-1.3.1-1.el5.rf

3. Create user(ftpuser) and group(ftpgroup) proftpd, I’am assumsing that the group and userid is 2001. Using a number that is free on your system.

[root@heri ~]# groupadd -g 2001 ftpgroup
[root@heri ~]# useradd -u 2001 -s /bin/false -d /bin/null -c "proftpd user" -g ftpgroup ftpuser

4. Log into your mysql, and then please enter your username and password your mysql.

[root@heri ~]# mysql -u root -p

5. Create database to proftpd with the database name is “ftp”.

mysql> create database ftp;

6. Create an user and give the priveleges to management the database “ftp”.

mysql> GRANT SELECT, INSERT, UPDATE, DELETE ON ftp.* TO 'proftpd'@'localhost' IDENTIFIED BY 'password';
mysql> GRANT SELECT, INSERT, UPDATE, DELETE ON ftp.* TO 'proftpd'@'localhost.localdomain' IDENTIFIED BY 'password';
mysql> FLUSH PRIVILEGES;

7. Create tables to database “ftp“.

mysql> use ftp;
mysql> CREATE TABLE ftpgroup (
    -> groupname varchar(16) NOT NULL default '',
    -> gid smallint(6) NOT NULL default '5500',
    -> members varchar(16) NOT NULL default '',
    -> KEY groupname (groupname)
    -> ) TYPE=MyISAM COMMENT='ProFTP group table';

mysql> CREATE TABLE ftpquotalimits (
    -> name varchar(30) default NULL,
    -> quota_type enum('user','group','class','all') NOT NULL default 'user',
    -> per_session enum('false','true') NOT NULL default 'false',
    -> limit_type enum('soft','hard') NOT NULL default 'soft',
    -> bytes_in_avail int(10) unsigned NOT NULL default '0',
    -> bytes_out_avail int(10) unsigned NOT NULL default '0',
    -> bytes_xfer_avail int(10) unsigned NOT NULL default '0',
    -> files_in_avail int(10) unsigned NOT NULL default '0',
    -> files_out_avail int(10) unsigned NOT NULL default '0',
    -> files_xfer_avail int(10) unsigned NOT NULL default '0'
    -> ) TYPE=MyISAM;

mysql> CREATE TABLE ftpquotatallies (
    -> name varchar(30) NOT NULL default '',
    -> quota_type enum('user','group','class','all') NOT NULL default 'user',
    -> bytes_in_used int(10) unsigned NOT NULL default '0',
    -> bytes_out_used int(10) unsigned NOT NULL default '0',
    -> bytes_xfer_used int(10) unsigned NOT NULL default '0',
    -> files_in_used int(10) unsigned NOT NULL default '0',
    -> files_out_used int(10) unsigned NOT NULL default '0',
    -> files_xfer_used int(10) unsigned NOT NULL default '0'
    -> ) TYPE=MyISAM;

mysql> CREATE TABLE ftpuser (
    -> id int(10) unsigned NOT NULL auto_increment,
    -> userid varchar(32) NOT NULL default '',
    -> passwd varchar(32) NOT NULL default '',
    -> uid smallint(6) NOT NULL default '5500',
    -> gid smallint(6) NOT NULL default '5500',
    -> homedir varchar(255) NOT NULL default '',
    -> shell varchar(16) NOT NULL default '/sbin/nologin',
    -> count int(11) NOT NULL default '0',
    -> accessed datetime NOT NULL default '0000-00-00 00:00:00',
    -> modified datetime NOT NULL default '0000-00-00 00:00:00',
    -> PRIMARY KEY (id),
    -> UNIQUE KEY userid (userid)
    -> ) TYPE=MyISAM COMMENT='ProFTP user table'

Baca entri selengkapnya »


Install dan konfigurasi ProFTPd

21 10 2008

Apa itu ProFTPd ?

ProFTPd adalah sebuah aplikasi yang di gunakan untuk melakukan transfer data atau yang lebih dikenal dengan FTP(file transfer protokol).
Dengan menggunakan proftpd kita dapat membuat sebuah server FTP dimana nantinya kita bisa membuat sebuah server yang bisa memberikan fasilitas upload dan download dari server tersebut. ProFTPd juga mudah untuk di konfigurasikan.

Baik kalau gitu kita mulai saja percobaan kita kali ini. Disto yang saya gunakan adalah Centos 5.2.

Paket-paket yang di butuhkan:
1. Gcc Compiler ( gcc, gcc-c++ )
2. Paket ProFTPd yang dapat di download langsung dari website resminya (http://www.proftpd.org)

Ingat, sebelum anda memulai instalasi paket proftpd ini, silahkan pastikan terlebih dahulu apakah di server anda sudah terinstall GCC compiler, anda bisa mengeceknya dengan perintah di bawah ini:

[root@heri ~]# rpm -qa | grep gcc
gcc-c++-4.1.2-42.el5
libgcc-4.1.2-42.el5
gcc-4.1.2-42.el5

Jika anda sudah memenuhi syarat di atas mari kita mulai instalasinya.

Tahap-tahap Instalasi dan Konfigurasi:

1. Buat direktori untuk menyimpan hasil download ProFTPd:
[root@heri ~]# mkdir /downloads

2. Pindah direktori ke direktori downloads
[root@heri ~]# cd /downloads

3. Download paket ProFTPd:
[root@heri downloads]# wget ftp://ftp.proftpd.org/distrib/source/proftpd-1.3.2rc1.tar.gz

4. Ekstrak paket tersebut:
[root@heri downloads]# tar xzvf proftpd-1.3.2rc1.tar.gz

5. Pindah ke direktori hasil ekstrakan proftpd tadi:
[root@heri downloads]# cd proftpd-1.3.2rc1

6. Kemudian tibalah saatnya kita mengkompile dan menginstall paket ProFTPd:
[root@heri proftpd-1.3.2rc1]# ./configure
[root@heri proftpd-1.3.2rc1]# make
[root@heri proftpd-1.3.2rc1]# make install
Baca entri selengkapnya »


Install OpenVZ di CentOS 5.2

15 10 2008

Apakah OpenVZ itu?

adalah sebuah otomasi server lengkap dan solusi virtualisasi yang dikembangkan oleh SWsoft. OpenVZ menciptakan berbagai macam Virtual Private Servers (VPS) pada server fisik tunggal untuk berbagi perangkat keras dan manajemen usaha dengan efisiensi maksimum. Masing-masing VPS melaksanakan dan mengeksekusi dengan tepat seperti sebuah server yang berdiri sendiri untuk para pengguna dan aplikasinya bisa menjadi rebooted yang bebas dan mempunyai akses root sendiri, para pengguna (user), alamat IP, memori, proses, file, aplikasi, sistem library, dan file konfigurasi. Perancangan yang efisien dari OpenVZ membuatnya menjadi virtualisasi pilihan untuk server memproduksi dengan aplikasi yang lebih hidup dan berupa data yang real-life. Dan dapat di pastikan tidak ada aplikasi yang saling konflik.

Tahap Instalasi:

1. Menambahkan repository openVZ
[root@heri ~]# cd /etc/yum.repos.d/
[root@heri yum.repos.d]# wget http://download.openvz.org/openvz.repo
[root@heri yum.repos.d]# rpm --import http://download.openvz.org/RPM-GPG-Key-OpenVZ

2. Instalasi “ovzkernel”, dimana kernel inilah yang akan di gunakan openVZ.
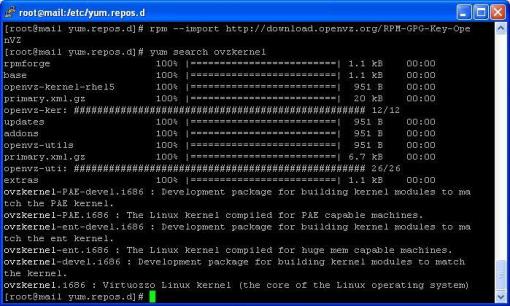
[root@heri ~]# yum search ovzkernel
Akan muncul tampilan seperti berikut ini:

Kemudian lakukan penginstalan terhadap kernel tersebut:
[root@heri ~]# yum install ovzkernel Baca entri selengkapnya »